Disclaimer: This article is a general overview of the UK student visa process based on my experience. It is not meant to be detailed visa guidance and is not a substitute for official guidance by UK Visas and Immigration (UKVI). Please always refer to the UKVI website for up-to-date and accurate visa information.
At this stage, you have met your offer conditions and received your Confirmation of Acceptance for Studies (CAS) letter. Congratulations! Now it’s time to take you through the UK student visa application process.
You can apply for a student visa from outside the UK (which will be the case for most of you about to start your degrees), or from within the UK (if you are already living in the country on a different visa/extending your student visa).
This article covers the student visa process when applying from overseas.
1. Prepare your Financial Evidence
You must prove that you have sufficient funds to pay for your course and support yourself in the UK, for your first year of study.
This means tuition fees and living expenses for the first year.
For living expenses, you need £1023 per month (for 9 months = £9207) for courses outside London, and £1334 per month (for 9 months = £12,006) for courses in London.
The cost of living in London is higher than in other UK cities.
Therefore;
The amount you need to have = Outstanding tuition fees + Living costs for 9 months
Please note any deposit/tuition fees paid will be indicated in your CAS.
This can be subtracted from the total funds that you need to show.
You must have this money for at least 28 consecutive days. The last transaction date must be no more than 31 days before you submit your online visa application.
(a) Self-funded/Funded by Parents or Legal Guardian
The funds must be in your or your parents’/legal guardian’s bank account.
If in your bank account, you only need to provide a bank statement showing that you’ve held the funds for 28 consecutive days, and the statement should not be older than a month from the date you submit your online application.
If using your parents’ or legal guardian’s bank statements, you must submit a signed letter of consent from them, and a legal document confirming your relationship.
This would be a birth certificate or a certificate of adoption proving you are your parent’s child.
For a legal guardian(s) – a court document naming the legal guardian(s).
The statements should contain the name of the bank, name of the account holder(s), account number, dates, and transactions covering at least 28 days. Please see the UKVI’s guidance for more details.
(b) Official Financial Sponsor
If you are being financially sponsored, you need to include a sponsor letter with your student visa application.
Official Sponsors include:
- A UK university
- Your home government
- The British Council
- An international company – this has to be a company that has an office in more than one country and a website with clear contact details for all the overseas offices
The sponsor letter should be on official letterhead paper and should include the following details:
- Your name
- Name and contact details of the financial sponsor
- Date of the letter
- Duration of the sponsorship
- Amount of money you will receive per month or if you are fully sponsored, a confirmation that your financial sponsor will “cover all of your course and living costs”
- If your scholarship also covers your family members the sponsor letter should confirm this and include their names as well as yours
It is worth noting that it is crucial to provide the financial evidence correctly.
It determines the success of your student visa application.
Spend some time to gather the evidence exactly as per the requirements.
Failure to get it right, and you risk your student visa being rejected.
2. Prepare your Supporting Documents
(a) Qualification Documents
You only need to submit the documents indicated in your CAS if your course is below degree level, for example, a foundation course.
If your course is degree level or above and your university is a Higher Education Provider with a track record of compliance, you do not need to submit qualification documents with your visa application.
The same applies to IELTS.
If your course is below degree level, you need to show your IELTS certificate with your student visa application.
If your course is degree level or above, then your English language competence would have been assessed as part of your offer conditions. This will be stated in your CAS.
Students from countries that are part of the “differentiation arrangement” do not need to submit financial evidence or qualification documents. However, UK Visas and Immigration (UKVI) may ask for these at a later date. It is advisable to prepare the documents and keep them ready.
(b) TB Certificate
As stated in my first post, students from certain countries require a tuberculosis test certificate.
The test is a chest x-ray at an approved UKVI test centre.
Click on your country’s link to check for approved test centres, as well as information on the booking process, test fees, and payment methods.
You have to include the TB certificate with your student visa application and carry it with you when you travel to the UK.
(c) Academic Technology Approval Scheme (ATAS) Certificate
Required for students from some countries applying to study certain courses in Science, Technology, and Engineering subject areas at postgraduate level.
This certificate is not required for undergraduate courses.
Your offer letter will confirm if you need to apply for an ATAS certificate.
It will also provide guidance on how to apply.
Please see detailed UKVI guidance on how to apply.
You need to apply early because the application takes at least 30 working days (6 weeks) to process.
The good news is that the application is free of charge! A rarity in your journey of getting to the UK.
(d) Extra Documents
These include:
- Parental consent letter (consent from both parents), and your birth certificate if you are under 18 at the time you apply for your student visa
- Official translations if your documents are not in English
3. Fill in the Online Student Visa Application Form
Once you’ve prepared your financial evidence and other supporting documents, the next step is to apply online on the UK Government website.
It is a straightforward application form, but one with quite a few sections I must say.
Some examples of details required in the form are:
- Personal details – name, address, relationship status
- Passport/National Identity Card details
- English language assessment
- Parents’ details
- Family in the UK
- Accommodation
- UK travel history
- Worldwide travel history
- Immigration history
- Convictions and other penalties
- Sponsor details (your university)
- Place of study – university address
- ATAS certificate details (if required)
- Course information – qualification, dates, fees
- Confirmation of financial evidence as described in Section 1 of this article
Your university might have a guidance document on how to fill in the application form. Use this so it’s easier for you.
You could also use the help of your education consultant if you are using one.
At the end of the form, you have to pay for the Immigration Health Surcharge (IHS) before you can pay the visa application fee.
The IHS is like a premium you pay to use the National Health Service (NHS) in the UK (“free” medical care).
The IHS costs £776 per year and £388 for a partial year.
For a 3-year undergraduate course, the total for IHS would be:
(£776 × 3) + £388 = £2,716
The additional £388 is applied because you are given additional time on your visa before the start of your course and at the end of your course.
You get 1 month before the start of your course, and an additional 4 months after the course end date indicated on your CAS.
After the IHS payment, you will be given further guidance on the next steps.
Please note at the end of 2024 the UK is going to stop Biometric Residence Permit (BRP) cards.
Students starting in the 2024/2025 academic year will likely receive an eVisa. However, enter the university’s Alternative Collection Location (ACL) code for BRP collection, if given the option in the student visa application form.
The final step is to submit your application and pay the student visa application fee – £490.
An important note. Make sure all your supporting documents are ready before you submit the application. Some of them can take time to acquire, such as the TB test and ATAS certificates.
Just to give you a bit of assurance, CANAM (a study abroad education consultant based in Canada) estimates the UK student visa rejection rate to be between 3% – 5%, which is quite low.
These rejections would most likely be because of obvious mistakes, such as insufficient funds. You can read more about this on CANAM’s website. These mistakes can definitely be avoided.
The point is if you do the right thing at each step, your visa application will be successful for sure, 100%.
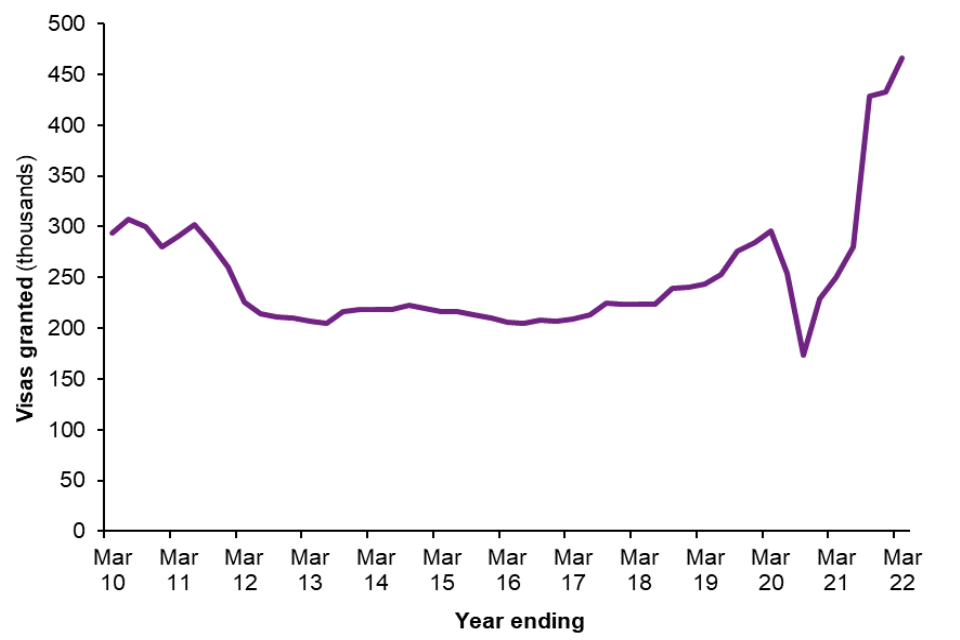
Below is a graph showing number of student visas granted each year. You can notice the exponential rise in student visas after the Covid-19 pandemic. I’d say the odds are pretty favourable.

4. Select the Visa Application Centre (VAC) and an Appointment Slot
After paying the visa fee, you’ll be redirected to the VAC website, where you choose a centre and an appointment slot for your biometrics (fingerprints and photograph).
You can find a VAC in your country here.
Some VACs are free to use while others charge a fee.
On the website, you’ll see options for additional services.
For example, an assisted service for scanning and uploading your supporting documents. This is if you choose to not do this yourself before your appointment. It is a paid service, obviously 🙂
There is the option of a priority visa service. You get a decision within 5 working days at an additional £500.
Oh, there is a super-priority service as well. You get a decision the next working day after attending your biometrics appointment. This is at an extra whooping £1000!
I would strongly advise applying for your visa early enough, so you don’t have to pay for the priority service.
For the standard application, you get a decision within 3 weeks.
Please note that the priority and super priority service may not be available at all VACs.
5. Attend your Biometrics Appointment
Attend your booked slot.
Take your original passport and all your original supporting documents (even if you’ve scanned and uploaded these yourself).
Your fingerprints and photograph will be taken.
You will submit your passport.
Once your application has been processed, your passport will be sent back to you with a vignette.
The vignette is a sticker on a blank page of your passport that allows you to enter the UK.
It is usually valid for 90 days.
If your visa is for 6 months or less, the vignette will be valid as a visa document for the duration of your visa.
For any student visa longer than this, you will have a BRP and/or an eVisa.
Your passport will be returned with a decision letter confirming that your application has been successful and your visa duration.
And that’s about it!
All you need to do now is wait for your visa and start preparing for your journey to the UK!
Conclusion
The student visa process has quite a few steps to it.
If you do each step the right way, following the guidance from UKVI, then your application will surely be successful.
In this article, I have given a general overview of the process. The key points are:
1. Prepare your financial evidence
2. Prepare your supporting documents including the TB certificate and ATAS certificate (for postgraduate technical courses)
3. Fill in the online application form on the UKVI website
4. Book your biometrics appointment
5. Attend your biometrics appointment and submit your passport
I wish you all the best with your visa application.
Be sure to follow UKVI guidance for each step.
If you’re unsure, ask your education consultant (if you are using the services of one).
Have you started the application process for your student visa? Don’t leave it too late!


